


Google released the Pixel 3 and Pixel 3 XL devices just a month ago. Along with the Qualcomm Snapdragon 845, 4GB RAM, 64/128GB internal storage, IP68 rating, wireless charging, and other hardware-based features, the devices also offers several software exclusives. One of these features is Night Sight, the camera feature which helps users shoot amazing photos in low-light conditions. We’ve already seen developers enable Night Sight for all Pixel devices, now we’re here to tell you how you can enable the new Call Screening feature on the Google Pixel 2, Google Pixel 2 XL, Google Pixel, and Google Pixel XL.
To refresh your memory, Call Screening is a new feature in the Google Phone app which takes over an incoming call to help you avoid scammers. Google Assistant tells the caller to leave a message, and you can choose to take over at any time. It’s a really convenient feature. Call Screening is currently available only for the Google Pixel 3 and Google Pixel 3 XL, but Google promised to bring it to the older generation Pixel devices later this month—just like Night Sight. But, you don’t have to wait any longer, so long as you live in the United States. Here are the instructions to enable Call Screening on the Google Pixel, Google Pixel XL, Google Pixel 2, and Google Pixel 2 XL. Your device needs root access to follow the procedure.
Enable Call Screening on Google Pixel and Google Pixel 2
Credits go to XDA Senior Member coolsid8 for sharing this method on our forums and to XDA Senior Member legents for discovering the flags.
- First of all, start by rooting your device if you haven’t already. Instructions and links can be found on this link.
- Download any root-enabled file explorer like FX File Explorer or MiXplorer.
- Open the explorer and navigate to the root directory from the left-side navigation menu.

- Navigate to
/data/data/com.google.android.dialer/shared_prefsand look for the file nameddialer_phenotype_flags.xml.
- Look for
__data_rollout__SpeakEasy.CallScreenOnPixelOneAndTwoRollout__launched__and change the value from ‘false’ to ‘true’. You can use the Find feature in the text editor.

- Look for
__data_rollout__SpeakEasy.OverrideUSLocaleCheckRollout__launched__and change the value from ‘false’ to ‘true’. You can use the Find feature in the text editor.

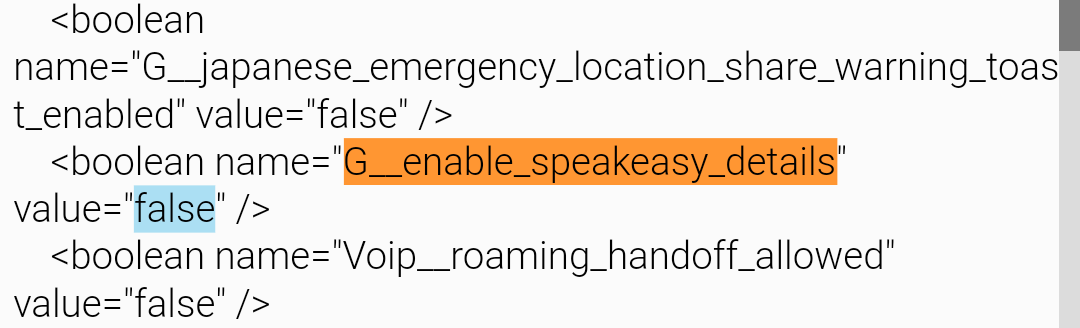
- Look for
G__enable_speakeasy_detailsand change the value from ‘false’ to ‘true’. You can use the Find feature in the text editor.

- Look for
G__speak_easy_bypass_locale_checkand change the value from ‘false’ to ‘true’. You can use the Find feature in the text editor.

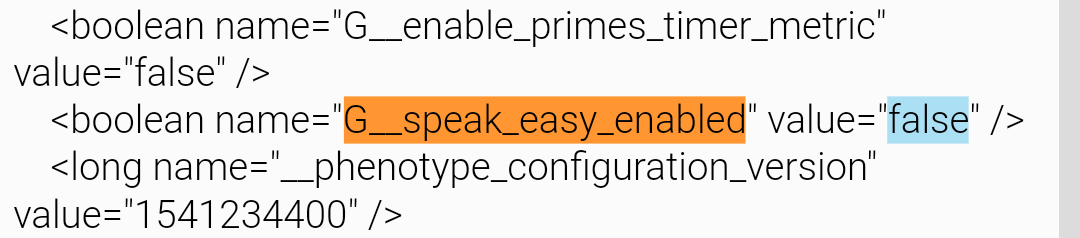
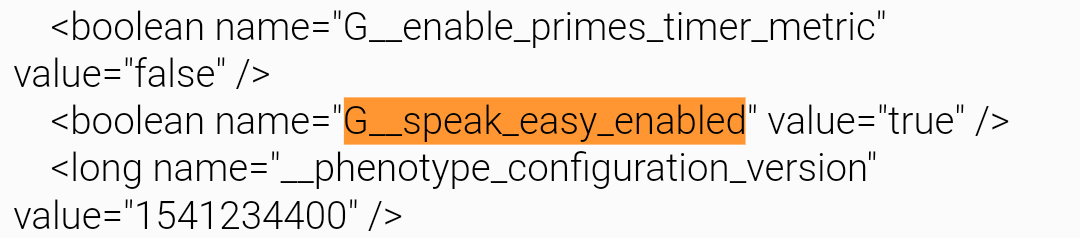
- Look for
G__speak_easy_enabledand change the value from ‘false’ to ‘true’. You can use the Find feature in the text editor.

- Open Settings, navigate to apps and select Phone. Force stop it.

- That’s it! Call Screening is now available under inside settings of Google Phone.


Now, this method is not guaranteed to work. Many users reported that it doesn’t work yet on the stock ROM, but some found success with version 24 of the app and version 14.5.70 of Google Play Services. Some people only got it working on custom ROMs, too. We can’t pinpoint the exact requirements for enabling this feature yet, but we’ll try to update the article as soon as we have new details.


0 comments:
Post a Comment